Categories
Words

Dodge and Burn using Lightroom Masks

It occurred to me while watching a video by Nick Page on Photoshop’s Luminosity masks that Lightroom Classic can now do something similar with luminance range masks. It’s not quite the same and won’t be as powerful, but it saves jumping to Photoshop and creating a 100MB tiff file.

You could always dodge and burn with the brush tool in Lightroom Classic, and by using a Brush Mask you can still do the same:

  1. Create a brush mask.
  2. Brush where you want to dodge or burn.
  3. Adjust exposure.
  4. Repeat for different exposures.

By using a luminance range mask in Lightroom Classic I could select the shades of dark or bright that I want to apply the effect to. By subtracting with a brush, I could modify the shape of the dodge/burn mask to my taste.

Sure enough, someone had done what I wanted already and had made a video of it. For a global dodge/burn, a change of .50 exposure can be a little too much, but that depends on your image.

For extra points, make an inverted sky mask and intersect with a luminance range mask to apply the dodge/burn there only, leaving your sky untouched.

And finally, make a preset of it! Click on the “+” next to Presets while editing and then “Create Preset…”. Uncheck everything and name your preset. Click on your dodge/burn masks in Masking, and click on “Support Amount Slider” in case you’ve modified that and save your new preset. New masks will be created when you apply the preset to another image. You can modify the intensity of the change to suit the new image.

If you’ve added an inverted sky mask, your preset will find the sky in any photo you apply the preset to everything but that part of the image.

The new masking tools in Lightroom Classic are very powerful. They’re really worth learning!

Categories
Funny Photography Words

Photoshopped in real life

If you don’t read xkcd you’re missing out 🙂

Categories
Gimp Photography Words

Get GIMPed Now!

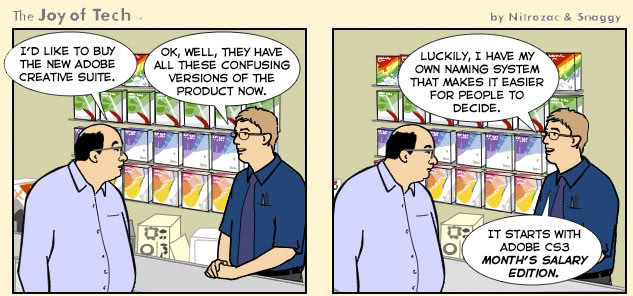
Joy of Tech makes a good point about the pricing of Adobe products. If you can’t afford to buy a copy of Photoshop then give the GIMP a go. It’d free, it’s what I use to process all my photos and it has many of the features most people need. (via)

Categories
Gimp Photography Words

The best way to show off the GIMP

I just read that a portable version of image manipulation program, GIMP, is now available for download.

If it works well enough that’s going to get a permanent home in my USB memory stick and unlike “Portable Photoshop”, this one is completely legal to copy and share.

GIMP Portable version 2.2.13 has been released. GIMP Portable is the full-featured GIMP image and photo editor bundled with a PortableApps.com launcher as a portable app, so you can edit your photos and images on the go. This new release updates the included GIMP to 2.2.13, adds Vista compatibility, correctly cleans up GTK’s bookmark and thumbnail files and features a greatly improved startup speed thanks to the new launcher’s plugin processing.

Categories
Photography Words

Airbrushed to beautiful

What is beauty? Beauty is in the eye of the beholder. Beauty is skin deep. Beauty is …

Dean Sherwood is the first photoblogger I’ve come across who linked to the campaign for real beauty video by Dove. He says he feels slightly hypocritical for posting it because it deals with the process of creating the image of a beautiful woman from make-up to photoshop trickery.

evolutiondove.jpg(via)

I understand how he feels but I have never felt bad about enhancing a photo. I don’t have the skill to do as good a job as they did in that video! Artists throughout the ages have made their subjects more beautiful. We get hot and bothered about it now because what they do is so much more accessible to the masses.

This video is manipulating you and making you think in a certain way. At the beginning of the video the woman’s face is in shadow. Bright lights are turned on one at a time, she’s not smiling, her hair isn’t even combed in a flattering manner. If she smiled I’m sure that face would glow with radiance.

Long before marketing and the fashion industry created the size 0 model men and women have made themselves up. Nature loves beauty. Does the peacock not display his feathers to attract a mate?

If you wonder if photos should be processed, read Who’s in Charge? You or the Camera? The camera rarely gets it right so you have to adjust the image until it matches what you saw in your mind’s eye. You should be in control.

Do I agree with Dove’s campaign? Yes, of course I do.

fountain-of-youth-thumb.jpg Here’s a very dramatic example of what can be done with a computer and some time and patience: Fountain of youth. It’s kind of scary what can be done!

The Dove advert is on YouTube now so I can embed it here:

(via)

Categories
Gimp Photography Words

Airbrush a pretty girl

You may have seen this already, it’s on delicious, but it’s something I’ll read over later so I want to mention it. This airbrush tutorial is very detailed, showing each step with accompanying screenshots.
The result is quite a stunning image in the Playboy tradition of perfect skin and tones. Fake but it’s what people want!

I posted a similar touch-up tutorial a few months ago, but it concentrated on general techniques for giving a portrait more punch.

Categories
Gimp Photography Words

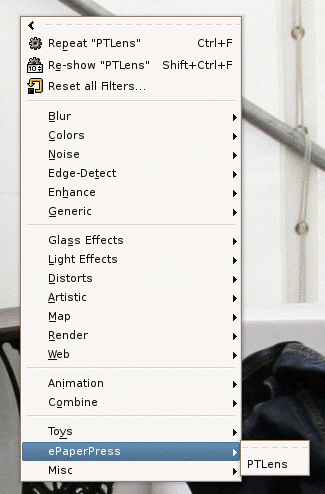
PSPI – Using Photoshop plugins in GIMP

2006-06-27_ptlens.png PSPI has long been the best way of running Photoshop in the Win32 version of GIMP. I’ve waited for a Linux version with anticipation and it has now been ported! Not all plugins will work, but I tried the trial version of PTLens and once I pointed it at the .dat file it worked perfectly, if quite slowly.

As well as the efforts to run Photoshop actions in GIMP this is a great addition to the GIMP arsenal of plugins and tools to aid photographers!

Need Photoshop plugins? This article reviews 10 free Photoshop plugins. I installed the Virtual Photographer one. It works quite well, although the preview window is a little wonky and don’t move the window or it won’t redraw.

Categories
Photography Words

Noise Ninja Beta

A new Noise Ninja release candidate is out now for Linux, Mac and Windows!

I tried the Linux version, and despite having a strange file selector it worked really well! You can try it for yourself, but the unregistered version saves images with a watermark. I’m going to test it on a few more images and may purchase it myslf.
Make sure you download a camera profile for your camera. The 20D one works well!

Categories
Photography Words

Cross-processing, Lomo, Fake Model, HDR, Sin City

Here’s yet another photo processing effect that may be destined to become yet another over used style on Flickr: The Sin City Style draws inspiration from the artwork of Frank Miller’s Sin City.
The example image is as gritty and powerful as Miller’s work and hopefully someone won’t write a Photoshop plugin or action to automate it. At least not for a week or so anyway.

Categories
Gimp Photography Words

Using Photoshop actions in GIMP

GIMP#, a project to provide a “C# wrapper around the GIMP API” and that “enables users to quickly write new GIMP plug-ins using .NET or Mono” has had some exciting developments recently.

Maurits is working on a GIMP# plugin that will hopefully allow GIMP to use Photoshop actions. AFAIK, these are basically files with calls to Photoshop functions. They are self-contained programs using a Photoshop programming API to perform operations on images. There are a countless number of Photoshop actions for download, free, shareware and commercial, so having access to these plugins would give GIMP a huge boost in terms of what it can do.

There are problems, some filters and functions in Photoshop simply aren’t available in GIMP but he has managed to parse 25 filters from the action files.

Lots of actions map on a GIMP equivalent. I downloaded about 100 action files and created a top 25 of most often used functions. At the top are functions like Brightness/Contrast, Set Selection, Gaussian Blur, etc. etc. The first function without a direct GIMP equivalent is the Chrome filter.

Categories
Gimp Gimp Tutorials Photography Tutorials Words

Simple steps to photo touch-up

In this post I’m going to show you how to go post-process this image:

By the end, we’ll have an image that looks like this:

This tutorial was created using the GIMP, but it’s equally applicable to your favourite editing software as long as it has the same tools. Photoshop, and other editing software should work equally well.
The steps described here are worth practising, and will apply equally well to any portrait!

First of all, I came across this photo on Flickr through my contacts page. Here’s the original photo, and Ayhtnic kindly let me use her image.

After you load the image, the first thing to do is use Auto Levels from the Layer->Colors menu. This tool alone does wonders for most photos, especially if they’ve been captured as Jpeg straight from the camera.

The image is a little noisy so let’s clean it up a bit. Use Selective Gaussian Blur from the Filters->Blur menu. Use small values as we just want to smudge the noise away without losing too much detail. A radius of 3, and delta of 10 worked fairly well here.

Let’s brighten it a bit and add contrast. Use the Curves tool from Layers->Colors for this. The classic “S” shape always adds life to a photo.

Open the Layers dialog and duplicate the background layer.

Select the new layer (called “background copy” here) and use the Curves tool again to brighten this layer a lot.

With the same layer selected (the top one, the “background copy”), we’ll apply some blur. Open up the Gaussian Blur tool, it’s in Filters->Blur. Apply a blur of 5 pixels to the top layer. Don’t worry, we’re not finished!

We’re going to change the “mode” of the top layer now. With the top layer selected, click on the dropdown box that says “Normal” and scroll down to “Soft Light”. You can also try other modes, they’ll make for interesting photos!
Notice how the image suddenly changed?

Even with the nice glowing effect, the image looks indistinct. Let’s sharpen the bottom layer. Select that layer in the Layers dialogue and load the “Unsharp Mask” filter. This is in Filters->Enhance->Unsharp Mask.
Don’t apply too much sharpening. Make it subtle. The settings in the screenshot work well.

All that’s left is to save the image, save it with a quality setting of 92%. Don’t bother with higher, as it’s practically impossible to see any difference in quality.