Categories
Aftershot Pro

Adventures adding a new lens to Aftershot Pro

Bibble 5 and Aftershot Pro have a useful lens correction function that will fix the distortion created by a camera lens when a photo is taken. You won’t even recognise the distortion unless you’re looking for it but quite often it can look like straight lines are slightly bent or bulging.

The animated gif above shows you what that distortion looks like in my favourite zoom lens, the Sigma 18-200mm DC. The middle of the image is clearly bulging out. The bottom of the sign isn’t straight but after correction it’s much better.

Unfortunately not every lens is supported. In the lens correction widget of Aftershot Pro you’ll see an “Uncalibrated Lens” message if your lens isn’t there.

Bibble 4 supported this lens and I only realised today that a bug in Bibble 5 and Aftershot identified the lens incorrectly and led me on a merry dance across the Internet. Bibble 5 and Aftershot Pro think my lens is the “Sigma 18-200mm DC OS” but my lens doesn’t have an Optical Stabilizer! Bibble 4 probably detected the lens correctly.

Unfortunately for me there’s no mention of “Sigma 18-200mm DC” in the “Canon Lens Table” or profile_canonlenstable.txt. Only the OS lens is mentioned and I presume the non OS lens was removed in Bibble 5 by error. Once I added an entry for my lens and added settings for the OS lens everything worked ok again.

Anyway, thanks to this ASP forum post and this Bibble forum post I was able to add my lens to Aftershot Pro. The nice thing about the lens database is that it is composed of text files that are easy to edit. I found a basic uncalibrated entry for the non OS lens. Unfortunately I didn’t search further or I’d have found the “Sigma 18-200mm DC” settings I wanted and saved myself some time! I created a new file called profile_mylenses.txt and added that filename to profile.txt.

First of all, I had to find the lens correction parameters that would fix things. The Bibble 5 post above links to sites that will help you figure out the correct a, b and c coefficients but thankfully I didn’t have far to look to find working figures.

I checked out PTLens first. It’s a programme that corrects lots of different lens distortions and it’s reasonably priced at US$25 per license. The author has shrewdly kept his lens distortion database in a secret format so I had to continue looking.

I then found LensFun, an open source tool to do much the same thing but using an older version of the PTLens database. The source is available so I went digging and found this interesting file! All the info I needed in one XML file!

All that remained to do was edit profile_mylenses.txt. In Windows and Linux the file can be placed in the following locations respectively. Mac OS X is probably in “Application Support” or somewhere obvious like that. In Windows you’ll want to use WordPad as the other profile files don’t have Windows line endings. You’ll also have to open it as an administrator to edit it.

C:\Program Files (x86)\Corel\Corel AfterShot Pro\supportfiles\Profiles\LensProfiles\
/opt/AfterShotPro/supportfiles/Profiles/LensProfiles/

After some editing and experimenting I found that these settings worked well:

begin lens
group: genericSLR
multiplier: 1.6
aperture: 3.5
menu_lens: Sigma 18-200mm f/3.5-6.3 DC OS
cal_abc: 18 0.018238 -0.045992 0.000000
cal_abc: 21 0.013683 -0.026594 0.000000
cal_abc: 24 0.007113 -0.008911 0.000000
cal_abc: 33 0.000000 0.010791 0.000000
cal_abc: 59 0.000000 0.012006 0.000000
cal_abc: 88 0.000000 0.010958 0.000000
cal_abc: 144 0.000000 0.008752 0.000000
cal_abc: 200 0.000000 0.007390 0.000000
end

I had to restart Aftershot Pro to test new settings each time.

If editing files like that puts you off you can create a preset to apply the lens correction. Click on the Manual tab in the Lens Correction widget where you can enter the a, b and c coefficients. Now go to the Presets widget and follow the instructions in my HOWTO: Add a copyright notice in Aftershot Pro tutorial except you’ll want the Lens Correction function to be active.

I suspect that these changes will be overwritten whenever I upgrade Aftershot Pro but maybe Corel will notice this little post of mine and they’ll fix the detection, or duplicate the settings in the next version..

While writing this post I found entries for the “Sigma 18-200mm f/3.5-6.3 DC” lens in profile_genericSLR.txt. Because the programme misidentified my lens it never used those settings. The 1.5 multiplier settings have the same settings as above, the 1.6 multiplier one is slightly different but there’s not much difference when applied to my test image.
Let that be a lesson to you if you’re trying to get this work. Look harder for an existing profile and make sure your lens is identified correctly! Argh!

Categories
Aftershot Pro Words

Aftershot Pro B&W Workflow

Martin, over at Photoakademie.eu created a workflow video showing how a photo was processed and eventually turned into a black and white image using Aftershot Pro.

Coming from a GIMP background I used layers and layer masks but never used adjustment layers to keep changes separate. Quite an eye opener for me!

Plus another demonstration of Aftershot Pro and a Google Plus account dedicated to sharing presets.

You can download a 30 day trial of Aftershot Pro here (I should be on commission for this..)

Aperture ƒ/9
Camera Canon EOS 40D
Focal length 18mm
ISO 100
Shutter speed 1/200s
Categories
Aftershot Pro Tutorials Words

HOWTO: Add a copyright notice in Aftershot Pro

This is a tutorial that will explain how to add a copyright notice to your photos in Aftershot Pro. It can even be done automatically when you export the image as a Jpeg for publishing online. In this tutorial you’ll learn how to create a new preset called “My Copyright Text”. This tutorial uses the zText plugin.

This is what a simple copyright message will look like but you can change it to suit your own needs.

After you install zText find it in the plugins tabs and enable it, type your copyright notice and set the size appropriately.

You can adjust where the message will appear on the “Preset” tab of the plugin.

Once you’re happy with your copyright message hop over to the Presets widget and click the + “Add Preset” icon.

This window will popup, rename the preset to something meaningful and click “None” to unselsect everything.

Go into the Advanced tab and select zTextPlug and you should see the settings you already configured. Click OK.

Click the Show checkbox next to your new preset and the “Done” button on the Preset widget.

If you have an output job configured you can add the copyright notice as a preset in the job settings to automate the task every time you export a file. One advantage of doing this is your image in Aftershot Pro won’t have the copyright text making it easier to export it again using a different batch output job.

Hope that helped, want some more Aftershot Pro tutorials?

Categories
Gimp Gimp Tutorials Photography Words

The Curves Tool

The curves tool is a very basic tool that can be used to improve photos with a few clicks of the mouse. It is used to change the brightness and contrast of an image. It can also modify the separate Red, Green and Blue channels of an image too. The Curves Tool has a histogram to represent the shadow, midtone and highlight detail in the image. In the GIMP, you access it by right clicking on an image and go to Colors->Curves.

This is the second article in my GIMP for Photographers series, but as usual, all of this applies to Photoshop, or any other image application with a Curves Tool. The first tutorial was on The Levels Tool, and worth a read if you missed it!

Here’s an image I shot at the Lord Mayor’s Picnic in Fitzgerald’s Park a few months ago, and the Curve Tool below it. Notice the histogram? The photo is fairly well exposed, but some highlights are “clipped”, as the histogram hits right hand side without sloping off.


Brightening Curve

It’s easy to brighten an image. Just drag points on the line up.


Darkening Curve

Now, let’s darken the image by dragging points down.


Contrast Curve

A classic use of the Curves Tool is to increase contrast in an image. You do this by darkening the shadows, and brightening the highlights. The curve looks sort of like an “S” when you do this. Don’t go overboard on this though, because it’s easy to lose detail in either direction.


If for some reason your image has too much contrast, a quick inverted S curve will solve that problem,


Wacky Colours

You can select any of the Red, Green and Blue channels and do strange things to your photos. Here’s what happens when you play with the Red Channel.


And here’s what happens when you change multiple colour channels in different ways.

Colour Picker

After you have opened the Curves Tool, click anywhere in the image. Notice how a vertical line goes up and down the histogram/line? That vertical line is the colour of the pixel where you clicked. That can be useful if you’re trying to modify a particular part of a photo. This is what you get when you click on the black coat on the left of the image above.

Aperture ƒ/6.3
Camera Canon EOS 20D
Focal length 18mm
ISO 200
Shutter speed 1/250s
Categories
Architecture Beach Canon 20D Cobh Cork Houses Ireland Night Photos Sea Sigma 10-20 Sky Sun Tutorials Water

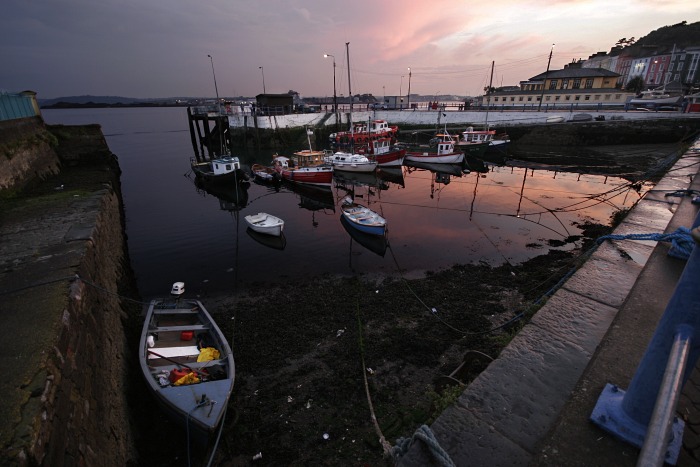
Cobh at sunset

The tide is out in Cobh, Co. Cork while the sun sets in the west casting an orange glow over the water and boats in the harbour.

Method
This required some work to expose properly. The sky is bright while the harbour, houses and landscape are in shadow. Out with the layers, top layer for the sky was darkened and the opposite was done for the ground.
Then it’s the simple task of adding a layer mask to the top layer and rubbing out the dark bits to expose the brightened landscape.
When using a layer mask, never paint with an opacity of 100%, try 30% or even 5%. Don’t be afraid to do a rough job of exposing the bottom layer because with a layer mask you can always reverse the procedure by swapping the colour of your brush with an opposite colour!

Thank you all for the comments on yesterday’s post, The Lonely Swan, it’s great to get feedback and I’m glad when people get something out of my methods when I describe them. See what you’ve done? I did it again!

Aperture ƒ/4
Camera Canon EOS 20D
Focal length 10mm
ISO 200
Shutter speed 1/20s
Categories
Abstract Architecture California Candid Canon 20D First Draft Gimp Tutorials People Photography San Francisco Sigma 10-20 Tutorials United States Urban Vehicles Words

First Draft: Ready to go!

John asked what did he original Ready to go! look like and I’ll oblige now. Showing what the original photo looks like is akin to showing what the first draft of a written essay or post reads like. Sometimes the image comes out perfectly in the camera but that’s rarely the case. At the very least light levels have to be balanced and if resizing for publication online then the resized image has to be sharpened.

Hover over the image below to see what the original shot looked like. Hopefully this will work for RSS readers but if it doesn’t, visit the blog and leave your mark here!

Notice how I rotated the image? I had to reconstruct the bumper on the right of the picture, as well as filling in the gaps at the other corners of the photo. Tree branches and leaves are easy enough, as is the relatively solid black texture of the tar on the road, but the bumper was difficult, and the shaded area of the building on the left presented me with a few extra minutes of clicking to get right.

Want to see more “First Draft” posts? I can’t promise to do many, but if you have a compelling reason why you’d like to see the original of a photo I’ll do my best to help!


Hosted on Flickr

PS. Bryan – you might recognise the CSS. I took it from the button of doom you did! Hope you don’t mind!

PPS. Treasa has posted a tutorial of how she worked on two photos with steps in Photoshop to get the desired effect. Nice!

Categories
Photography Words

Making Beautiful Portraits

Photodoto published Making Portraits this morning which got me thinking more about my street photography tomorrow. I wonder will people pose on the street for me? Do I have the nerve to approach complete strangers, make them feel at ease, connect with them and take their photo?

I know I won’t need it when I’m outside tomorrow, but Strobist linked to a professional lighting setup for portraiture in a studio. Might come in handy later.

The venerable Philip Green’s portrait page is of course a good read. It’s been around for years and I’ve read it many times. If you haven’t browsed http://www.photo.net/learn/ yet then you’re missing out!

Finally, Anandtech’s Portrait Tutorial is good, includes examples but I wonder why their second photo was included. The poor girl has stone columns coming out of her shoulders, even when blurred!

Categories
Photography Tutorials Words

Lighting 101 – all in one place

David at Strobist has linked to all his flash lighting articles in one place. It’s a really good place to go if you want to get the most out of your flash.

Another great resource is Photonotes: Eos Flash for users of Canon cameras and flash units. There’s some great bits of info there.

Categories
Equipment Photography Tutorials Words

Shooting panoramas el cheapo

112588_panoheadcamera2.jpg If you’ve ever tried stitching photos together to create a panoramic photograph you’ll be more than aware of the awful distortion between one frame and the next. That’s one reason why it’s recommended that frames overlap by at least a third.

There is so much distortion because the camera is rotated around using a normal tripod or worse still, handheld. The axis around which the camera is rotated is centered on the camera body usually, but a panoramic tripod is different. The center of rotation should be the lens of the camera, specifically the “nodal point” of the lens where light paths cross before hitting the camera’s film or sensor.

Make Blog links to a tutorial on building a panoramic tripod head for $10! That’s a lot more reasonable than what you’d pay for a head from Manfrotto or manufacturer. It probably isn’t quite as portable or nice looking though and you might have to invest in some tools to cut the wood and build it but it would be an interesting project.

If that’s too complicated, you can build a battery using a bit of wire, a screw and a magnet!

Aperture ƒ/4
Camera DiMAGE 7
Focal length 9.6640625mm
ISO 200
Shutter speed 1/45s
Categories
Gimp Gimp Tutorials Photography Tutorials Words

GIMP Tutorial Videos

Jakub ‘jimmac’ Steiner has published several demos of the GIMP in action.
Subjects such as defining shortcuts, image templates, transformations and paths and more are covered. Use the mirrors, because I haven’t downloaded the videos myself yet!

Categories
Photography Tutorials Words

Faking Depth of Field

First it was lomo, then cross-processing, and now the latest craze among online photographers seems to be making their photos look like miniture models.
A common side-effect of macro photography is a shallow depth of field (DOF) which means that only a small portion of the scene is in focus. Luckily this effect is very easy to emulate and here’s a tutorial to show you how. Pay attention to Christopher’s advise about what sort of shots work well! You could also buy a Len Baby which does a similar job and more!
Daily Dose of Imagery has a very good example of the “fake model” photo. He blurred the foreground and background, but some middle distance objects are in focus and intersect the blurred area. Nicely done.

Even after an effect becomes stale and overused online, there’s always the print world. People seem to like that sort of stuff all the time!

Categories
Links Photography Tutorials Words

Starting Photography, Digital Workflow, Orphans and Amazing Zooming Images

Starting out in Photography
A few weeks back, Tom asked me by email about starting out in photography as he recently bought a Canon 350D and started posting photos online!
Some people are born with a talent and an eye for photography, but for the rest of us, practise makes perfect. Bring your camera with you wherever you go and take photos at every opportunity. This method is scoffed at by many but it works, and by examining everything later you’ll find a few gems hidden among the duds. Occasionally you’ll remember the next time you’re out that a particular shot worked well and use that lesson to improve the composition of a shot.

You must buy “Understanding Exposure” by Bryan Peterson.. My understanding of my camera completely changed after I read that. I linked to it on my blog ages ago and I go back to it on occasion.
His Creative book is good too, but not as much of an eye opener!

I went to a meeting of the Mallow Camera Club last December. It was interesting, but for various reasons I haven’t gone back there yet. They meet every Monday night if you’re interested. Cork Camera Club meet in the Garda Social Club on Tuesday nights. I don’t know anything about them however.

Subscribe to the flickr Interestingness feed: http://feeds.feedburner.com/InterestingFlickr – it has a lot of saturated/contrasty images but it’s still interesting. Bloglines sometimes quickly fills up with the max of 200 posts!

Digital Workflow
Your digital workflow describes how photos get from your camera to the screen and printed in a frame in your living room. It all depends on your software and operating system. If you’re using Linux, you might be interested in Jason’s one.
My own workflow revolves around a simple directory structure with top level YYYY directories, and sub-directories named after the current day in “YYYY-MM-DD – description” format. The description on the folder is generally good enough to help me find most images quickly. In each folder is another one called “Complete” which is a work and output directory. I save work in progress images in .xcf format, and the final result as 92% quality jpeg files. I use a simple script to copy files off my camera.
Here’s how I name images:

  • Large, original size or only cropped images have “-l” added to them. ie. img_9999-l.jpg
  • Medium size, 700 pixel wide or high images have a “-m” extension: img_9999-m.jpg
  • And anything smaller has “-s” attached to them.
  • Unfinished files have “-wip” appended to them usually.

I like Jason’s “current” work directory idea. I’ll have to modify my workflow somewhat and rename each image with YYYY-MM-DD prefixed to it if I’m going to use a global work directory but it would make backing up files easier.

Before uploading images I always resize them so the longest side is 700 pixels long. Almost all the images on this blog have that contstraint. Resizing an images involves the removal of information and makes the remaining pixels slightly more fuzzy. A straight vertical black line on a white background in a large image may have a ghostly border around it and it will be merged with the background colour making for a grey line. One of the most common ways of fixing this is to use the unsharp mask plugin which gives the illusion of sharpening an image by increasing local contrast. There are numerous unsharp mask tutorials online so I’ll let you find the one that best describes it to you.
Please remember, always resize your images before uploading them. Browsers are completely useless at resizing images!

Orphans, Zooming and Other Links

  • Urgent Call for Your Action on Orphan Works – a law is about to be passed in the United States making it much easier for photographs and visual works to be used without attribution or payment. Peter Marshall has a clear write-up about the danger of this bill while mrbrown describes it as a “possible disaster for all photographers”.
    How do I feel about attribution and image usage? Photographers and artists must be recognised. I have heard that my images have been used occasionally by others as desktop backgrounds or screensavers, and that’s great, but please leave a comment on that blog post if you use a photo. It will encourage me to continue posting!
    Printing my name and url on images is an option but it looks ugly and limits the appeal of a photo. Is it possible to embed those into the EXIF info?
  • Over on Hotwired I spied a very cool zooming image demo that could be built on to create a nice gallery script. I don’t like or browse gallery sites very often but this looks nice. It needs more work to be a polished work but I hope to see someone carry this project on to greater heights!
  • Top 10 Tips for Getting Attention on Flickr – worth a read if you’re a Flickr user. A few tips I hadn’t thought of and new ideas I must put into practise.
  • Fluid Effect – more before and after shots of beautiful people. It’s amazing what can be done!
  • One tip I picked up from the Flickr advanced user guide is the upload by email and and “blog this” function. It works well, but inserts two line breaks into my blog posts for some reason.
  • Shooting action shots in low light is a useful read if you’ve ever wondered why everything was blurry after that night out in the pub!
  • Peter noticed that Digital Journalist turned 100 this month! This magazine is such a good read, but I haven’t had time recently to look at this month’s issue.
  • Canon 5D vs 20D – full frame vs APS-C. What do you need? The full frame sensor wins, but not by much. In a “Practical Photography” magazine review of the NIkon D200 vs the Canon 5D, the Nikon won because it offered the best value for money. If you’re printing at higher than A3 size then buy a 5D but otherwise a 20D or D200 will suffice!
  • A positive review of the Sigma 18-200 lens which is rarely off my Canon 20D!
  • Version 4.6 of Bibble, a RAW photo processing tool available for Linux, Windows and Mac now comes with Noise Ninja included! The press release doesn’t make it clear if Noise Ninja is included in the “Lite” version but I’ll be giving it a whirl over the next few days and I’ll report back here on my first impressions! Later.. Bibblelite for Linux includes “basic” Noise Ninja support but they forgot to include the library file in the 4.6 release! Follow the instructions here to install it. It’s not the full Noise Ninja plugin, but Bibble will use it if available. As Noise Ninja isn’t available for Linux yet it’s a boon to have access to this cut down version!