Categories
Words

Dodge and Burn using Lightroom Masks

It occurred to me while watching a video by Nick Page on Photoshop’s Luminosity masks that Lightroom Classic can now do something similar with luminance range masks. It’s not quite the same and won’t be as powerful, but it saves jumping to Photoshop and creating a 100MB tiff file.

You could always dodge and burn with the brush tool in Lightroom Classic, and by using a Brush Mask you can still do the same:

  1. Create a brush mask.
  2. Brush where you want to dodge or burn.
  3. Adjust exposure.
  4. Repeat for different exposures.

By using a luminance range mask in Lightroom Classic I could select the shades of dark or bright that I want to apply the effect to. By subtracting with a brush, I could modify the shape of the dodge/burn mask to my taste.

Sure enough, someone had done what I wanted already and had made a video of it. For a global dodge/burn, a change of .50 exposure can be a little too much, but that depends on your image.

For extra points, make an inverted sky mask and intersect with a luminance range mask to apply the dodge/burn there only, leaving your sky untouched.

And finally, make a preset of it! Click on the “+” next to Presets while editing and then “Create Preset…”. Uncheck everything and name your preset. Click on your dodge/burn masks in Masking, and click on “Support Amount Slider” in case you’ve modified that and save your new preset. New masks will be created when you apply the preset to another image. You can modify the intensity of the change to suit the new image.

If you’ve added an inverted sky mask, your preset will find the sky in any photo you apply the preset to everything but that part of the image.

The new masking tools in Lightroom Classic are very powerful. They’re really worth learning!

Categories
Photography Words

Lightroom Tips and Videos

At the recent Automattic Grand Meetup in Utah I presented a Lightroom tutorial. During the course of the tutorial I went through the various Develop panels explaining what (most of) the sliders did, offering some advice sometimes on how to use them.

Here’s a few tips from the night and links you’ll find useful:

  • Use ALT/OPTION to tune the white and black sliders to see how much the highlights are blown or shadows totally black.
  • Hold down SHIFT and double click the white and black slider titles to auto set them. Be warned that Lightroom will stretch the histogram to do this and avoid losing data but that might not be what you want to do.
  • Use the Upright tool (lens correction) to correct distortions and horizons.
  • Don’t overdo “clarity”. It’ll introduce halos.

When editing a photo it’s useful to begin by setting highlights to -100, shadows to +100, and adjust the whites/blacks using one of the techniques above. Pull back the highlights and shadows to suit your taste, and increase the contrast.

Lightroom Basic Panel

Serge Ramelli has a great Youtube channel. He has an over abundance of “subscribe to my newsletter” and “buy my course” notifications but his videos are still worth watching. If you want to download the RAW files he uses you’ll find them here. I enjoy his sunset tutorials and videos:

And I love what he did with this:

I think I discovered his channel first by searching for black and white tutorial videos. This one got me hooked:

Also check out Anthony Morganti’s channel. His video on sharpening and noise reduction is excellent.

https://www.youtube.com/watch?v=imYJccSKx3E

Aperture ƒ/8
Camera Canon EOS 6D
Focal length 82mm
ISO 100
Shutter speed 1/200s
Categories
Academy Street Canon 10-22 Canon 20D Cork Ireland Lights Long Exposure Look up Photography Urban Words

How to short circuit

Ever since I posted Short Circuit I’ve been meaning to post a small tutorial on how I did it. There were so many comments from people clamouring to know the secret of how I made traces of light dance around the picture frame.

Actually, nobody asked. Will was kind enough to suggest another title but otherwise it went unremarked. *sob* I’m going to tell you anyway.

The image is a long exposure shot, of at least 1 second and preferably 4 or 5 seconds. I simply stood in front of a construction site at night, lifted the camera, hit the shutter and rotated the camera around in my hands. Needless to say, I did not have the strap around my neck or I would have done myself damage!
At first I tried Aperture Priority mode, setting the aperture really small (big numbers, around F/22), but then I decided to do the obvious, and used Shutter Priority and simply set the speed(time) I wanted. Below are a few shots from that night, including the scene as it was on the night and some experimental shots as I practiced. The technique is really easy, but can create some really interesting and eye catching photos.

Aperture ƒ/3.5
Camera Canon EOS 20D
Focal length 10mm
ISO 800
Shutter speed 1/10s
Categories
Gimp Photography Words

Airbrush a pretty girl

You may have seen this already, it’s on delicious, but it’s something I’ll read over later so I want to mention it. This airbrush tutorial is very detailed, showing each step with accompanying screenshots.
The result is quite a stunning image in the Playboy tradition of perfect skin and tones. Fake but it’s what people want!

I posted a similar touch-up tutorial a few months ago, but it concentrated on general techniques for giving a portrait more punch.

Categories
Flickr Photography Words

Making the top ten of Interestingness

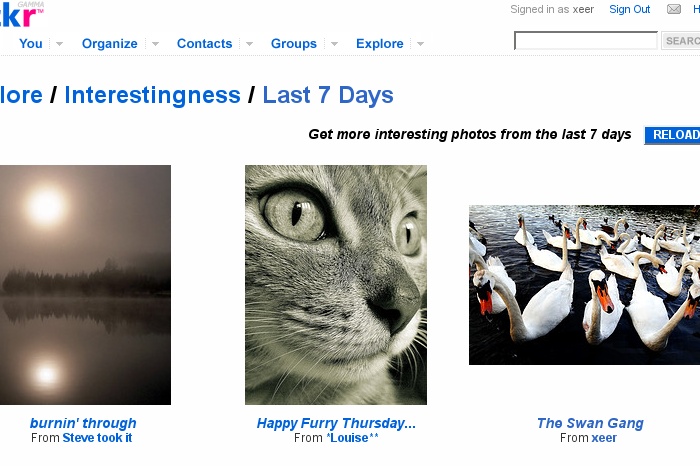
The Swan Gang, a photo I posted three days ago, became the 4th most interesting photo on Flickr two days ago.

How?

Nuggets of Gold
Flickr Interestingness uses a secret algorithm to decide what is interesting, but is biased against users who consistently get a lot of attention. Up until last month I would add my photos to many groups in the hope of attracting attention and eyeballs and yes, a number of my photos are in the interesting list but it was getting harder for me to get high results.
Last month I got married, took the month off and hardly touched a computer. Most of the photos published that month haven’t been added to any group so I think that helped me when it came to publishing this photo.

Groups
There are a number of photo groups on Flickr where members are encouraged to leave comments on the photographs of other users. If you look at my Swan photo again some of them are listed down the right hand side. That’s a good way of getting attention. Don’t even consider posting to these groups if you haven’t got time to participate yourself. For every photo you post, you may have to leave comments on up to 5 other photos. It’s extra work, but viewing other people’s work is inspiring and always a good way to improve your own technique.

Thumbnail
The thumbnail looks good. The swans have these bright orange beaks and are looking into the camera. It screams “Click Me!”

The Swan Gang

Time
I uploaded the photo to Flickr around 10:30am Irish time but I didn’t add it to any groups until much later in the day when the US is awake. I have consistently noticed that photos I add to Flickr groups early in the morning don’t build up the same number of views as quickly as when they’re posted later on in the day.

Links
One other factor that interestingness is judged upon is where traffic comes from. If someone links to your photos from outside Flickr like happened here that will help a lot. I have seen this a few times and each time it made a noticeable difference to how high a particular photo went.

Magic
And then add some Flickr magic to finish off!

Further Reading:

Categories
Links Photography Tutorials Words

Starting Photography, Digital Workflow, Orphans and Amazing Zooming Images

Starting out in Photography
A few weeks back, Tom asked me by email about starting out in photography as he recently bought a Canon 350D and started posting photos online!
Some people are born with a talent and an eye for photography, but for the rest of us, practise makes perfect. Bring your camera with you wherever you go and take photos at every opportunity. This method is scoffed at by many but it works, and by examining everything later you’ll find a few gems hidden among the duds. Occasionally you’ll remember the next time you’re out that a particular shot worked well and use that lesson to improve the composition of a shot.

You must buy “Understanding Exposure” by Bryan Peterson.. My understanding of my camera completely changed after I read that. I linked to it on my blog ages ago and I go back to it on occasion.
His Creative book is good too, but not as much of an eye opener!

I went to a meeting of the Mallow Camera Club last December. It was interesting, but for various reasons I haven’t gone back there yet. They meet every Monday night if you’re interested. Cork Camera Club meet in the Garda Social Club on Tuesday nights. I don’t know anything about them however.

Subscribe to the flickr Interestingness feed: http://feeds.feedburner.com/InterestingFlickr – it has a lot of saturated/contrasty images but it’s still interesting. Bloglines sometimes quickly fills up with the max of 200 posts!

Digital Workflow
Your digital workflow describes how photos get from your camera to the screen and printed in a frame in your living room. It all depends on your software and operating system. If you’re using Linux, you might be interested in Jason’s one.
My own workflow revolves around a simple directory structure with top level YYYY directories, and sub-directories named after the current day in “YYYY-MM-DD – description” format. The description on the folder is generally good enough to help me find most images quickly. In each folder is another one called “Complete” which is a work and output directory. I save work in progress images in .xcf format, and the final result as 92% quality jpeg files. I use a simple script to copy files off my camera.
Here’s how I name images:

  • Large, original size or only cropped images have “-l” added to them. ie. img_9999-l.jpg
  • Medium size, 700 pixel wide or high images have a “-m” extension: img_9999-m.jpg
  • And anything smaller has “-s” attached to them.
  • Unfinished files have “-wip” appended to them usually.

I like Jason’s “current” work directory idea. I’ll have to modify my workflow somewhat and rename each image with YYYY-MM-DD prefixed to it if I’m going to use a global work directory but it would make backing up files easier.

Before uploading images I always resize them so the longest side is 700 pixels long. Almost all the images on this blog have that contstraint. Resizing an images involves the removal of information and makes the remaining pixels slightly more fuzzy. A straight vertical black line on a white background in a large image may have a ghostly border around it and it will be merged with the background colour making for a grey line. One of the most common ways of fixing this is to use the unsharp mask plugin which gives the illusion of sharpening an image by increasing local contrast. There are numerous unsharp mask tutorials online so I’ll let you find the one that best describes it to you.
Please remember, always resize your images before uploading them. Browsers are completely useless at resizing images!

Orphans, Zooming and Other Links

  • Urgent Call for Your Action on Orphan Works – a law is about to be passed in the United States making it much easier for photographs and visual works to be used without attribution or payment. Peter Marshall has a clear write-up about the danger of this bill while mrbrown describes it as a “possible disaster for all photographers”.
    How do I feel about attribution and image usage? Photographers and artists must be recognised. I have heard that my images have been used occasionally by others as desktop backgrounds or screensavers, and that’s great, but please leave a comment on that blog post if you use a photo. It will encourage me to continue posting!
    Printing my name and url on images is an option but it looks ugly and limits the appeal of a photo. Is it possible to embed those into the EXIF info?
  • Over on Hotwired I spied a very cool zooming image demo that could be built on to create a nice gallery script. I don’t like or browse gallery sites very often but this looks nice. It needs more work to be a polished work but I hope to see someone carry this project on to greater heights!
  • Top 10 Tips for Getting Attention on Flickr – worth a read if you’re a Flickr user. A few tips I hadn’t thought of and new ideas I must put into practise.
  • Fluid Effect – more before and after shots of beautiful people. It’s amazing what can be done!
  • One tip I picked up from the Flickr advanced user guide is the upload by email and and “blog this” function. It works well, but inserts two line breaks into my blog posts for some reason.
  • Shooting action shots in low light is a useful read if you’ve ever wondered why everything was blurry after that night out in the pub!
  • Peter noticed that Digital Journalist turned 100 this month! This magazine is such a good read, but I haven’t had time recently to look at this month’s issue.
  • Canon 5D vs 20D – full frame vs APS-C. What do you need? The full frame sensor wins, but not by much. In a “Practical Photography” magazine review of the NIkon D200 vs the Canon 5D, the Nikon won because it offered the best value for money. If you’re printing at higher than A3 size then buy a 5D but otherwise a 20D or D200 will suffice!
  • A positive review of the Sigma 18-200 lens which is rarely off my Canon 20D!
  • Version 4.6 of Bibble, a RAW photo processing tool available for Linux, Windows and Mac now comes with Noise Ninja included! The press release doesn’t make it clear if Noise Ninja is included in the “Lite” version but I’ll be giving it a whirl over the next few days and I’ll report back here on my first impressions! Later.. Bibblelite for Linux includes “basic” Noise Ninja support but they forgot to include the library file in the 4.6 release! Follow the instructions here to install it. It’s not the full Noise Ninja plugin, but Bibble will use it if available. As Noise Ninja isn’t available for Linux yet it’s a boon to have access to this cut down version!