
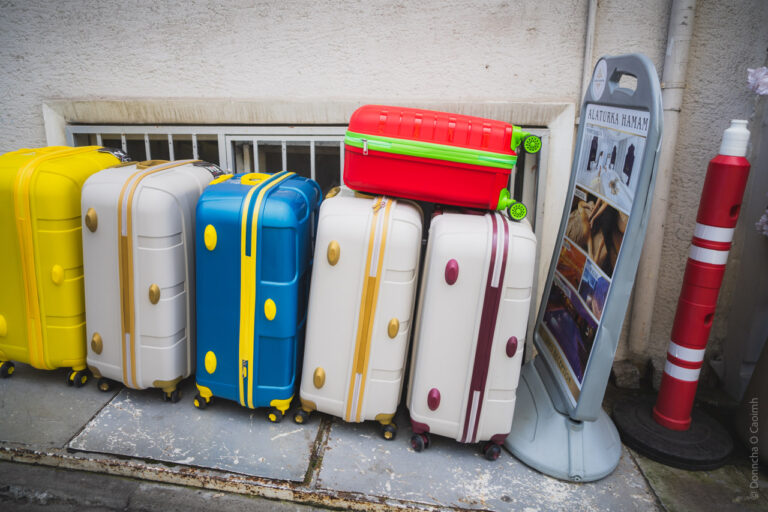


The Great Suitcase Lineup
In a city of tourists, you can’t have enough suitcases, and that’s true of Istanbul. Tourists everywhere in the old city, and numerous places to buy clothes, goods, trinkets and souvenirs. You’ll be needing another suitcase to bring it all home with you! I don’t share links very often, but here are a few you’ll…
Lightroom Classic doesn’t always adjust time correctly
I can confirm that this bug still exists. If you change the capture time of a photo in Lightroom Classic it may not do it correctly. The time was wrong on my camera and I had to change 249 images this evening. As I went through them later, I noticed a few were out of…
HDR in ON1 Photo RAW 2021 vs Lightroom
I got an email from On1 again this morning offering a free trial of the latest version of their raw processor. Since I just paid for another year of Adobe Lightroom I’m not going to switch but every year ON1 Photo RAW gets better and better. I took loads of bracketed photos at Blarney Castle…
Careful Importing Video from Sony Cameras
I made one of the big mistakes of photography last night. I formatted my SD card before checking that everything had been imported correctly. I’m still not 100% sure how this happened but none of the videos I recorded were imported. Most of the time I don’t bother formatting the card immediately because there’s plenty…
How to develop an underexposed photo in Lightroom
https://videopress.com/v/tyBy0av9 I had fun rescuing this really underexposed landscape photo in Lightroom. It’s a photo of Kilcrea Friary in Co Cork and I went out there one September evening in 2015 with a few others from Blarney Photography Club to shoot the sunset. I remember the day was somewhat cloudy so I hoped there would…
More fun with long exposure stacking of photos
A few months ago I experimented with Imagemagick by using it to merge very similar photos of flowing water to give the impression of a longer exposure. Here are a few more examples. By merging a series of thirty photos taken two seconds apart I created a pleasing image that looks like a sixty second…
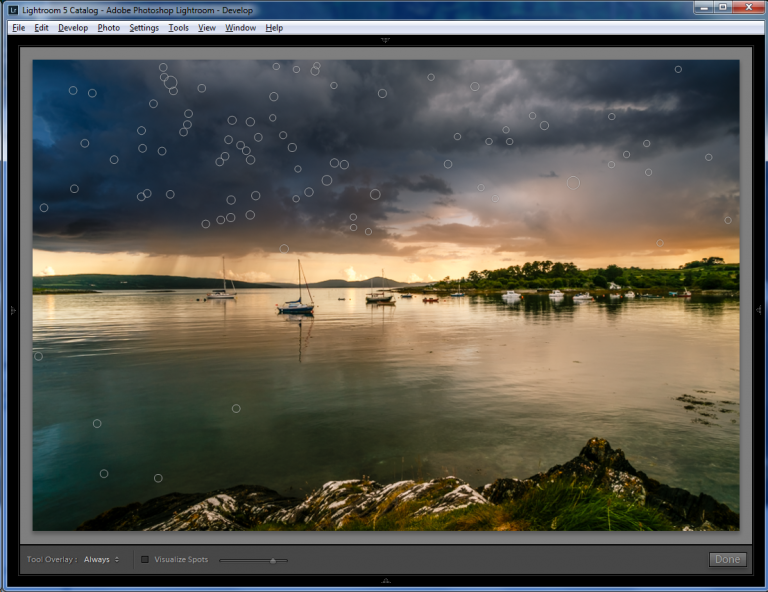
The Limits of Lightroom’s Smart Previews
I just stretched the limits of Lightroom’s Smart Previews this morning. After editing the following image I decided to see what it looked like as a smart preview. I pushed the image quite a bit, exposing the colour in the sky as the sun set behind me in Lanzarote a few days ago. The original…
Lightroom Tips and Videos
At the recent Automattic Grand Meetup in Utah I presented a Lightroom tutorial. During the course of the tutorial I went through the various Develop panels explaining what (most of) the sliders did, offering some advice sometimes on how to use them. Here’s a few tips from the night and links you’ll find useful: Use…
Use Lightroom Collections to Publish Photos
Since I started posting photos online I’ve always created two images: A web sized version to go online. A full size version for my archive. This has served me well as I have from time to time changed the software I use to develop photos. Otherwise, I might have the web version and not be…
I may have dust on my camera sensor
One of the downsides of being able to change lens is the ever present danger of dust getting into the camera and coating the sensitive sensor. Every time the lens is taken off there’s a chance that dust will swirl into the cavity of the camera, attracted by the charged sensor on the back wall…